eemanalyzeR is an R package providing tools for
processing and analyzing raw excitation-emission matrices (EEMs) and
absorbance data. Includes functions for:
- data cleaning
- quality assurance
- calculation of indices
- generating visualizations
- exported cleaned data
The package is designed to create a streamlined and automated workflow that ensures consistent analysis and simplifies the coding required to process the data.
The Need
While many instruments to measure EEMs and absorbance come with built in software to perform post-processing steps, using those tools can lead to reproducibility issues as the processing steps are often not well tracked or easily repeatable.
The drEEM toolbox in MATLAB was one of the first tools to address this issue, allowing for users to create a processing script that allowed for replication and consistent methods. However, MATLAB is a proprietary software, limiting its accessibly.
Two R packages have been created to provide open access processing tools:
However, these tools require a fair bit of coding knowledge to set up
a processing procedure. The eemanalyzeR package aims to be
simple enough that undergraduates, who are often the ones running the
instruments, can process the data to shorten the time between data
collection and data checks to ensure samples can be rerun within hold
times.
This package aims to fill the following gaps:
- More comprehensive dealing with absorbance data
- Applying QA/QC checks to ensure quality data
- Automate processing via a single function to make it easy for beginner coders to use
- Retain the ability to customize processing steps
Installation
Install and load the most recent approved version from CRAN by running
install.packages("eemanalyzeR")Install and load the most recent version of eemanalyzeR
from GitHub by running
# Installing from GitHub requires you first install the remotes package
install.packages("remotes")

# install the most recent version from GitHub
remotes::install_github("katiewampler/eemanalyzeR", ref = "master")
Install and load the most recent development version
of eemanalyzeR from GitHub by running
# Installing from GitHub requires you first install the remotes package
install.packages("remotes")

# install the most recent development version from GitHub
remotes::install_github("katiewampler/eemanalyzeR", ref = "dev")
Load the package
library(eemanalyzeR)
#> Registered S3 method overwritten by 'eemanalyzeR':
#>   method       from
#>   plot.eemlist eemR
#> User configuration loaded from file:
#> ~/.local/share/eemanalyzeR/user-config.yaml
Processing Data
To go from raw data to processed and clean data use the
run_eems() function. At a minimum this requires the
following arguments:
- input_dir: the file path to the folder containing the raw EEMs and absorbance files on your computer.
- filename: the name of your project, used to name your exported files.
  run_eems(input_dir = system.file("extdata", package = "eemanalyzeR"),
           filename = "eemanalyzeR-example")
This function will export the processed data, indices calculations, and plots by default. We can look at the function outputs:
#> ~/
#> ├── B1S1ExampleBlankSEM.png
#> ├── B1S2ExampleTeaStdSEM.png
#> ├── B1S3ExampleSampleSEM.png
#> ├── ManualExampleTeaWaterfallPlotSample.png
#> ├── absorbance_plot_eemanalyzeR-example.png
#> ├── summary_plots_eemanalyzeR-example.png
#> ├── absindices_eemanalyzeR-example.csv
#> ├── fluorindices_eemanalyzeR-example.csv
#> ├── metadata_eemanalyzeR-example.csv
#> ├── processed_data_eemanalyzeR-example.rds
#> └── readme_eemanalyzeR-example.txt
The Outputs
-
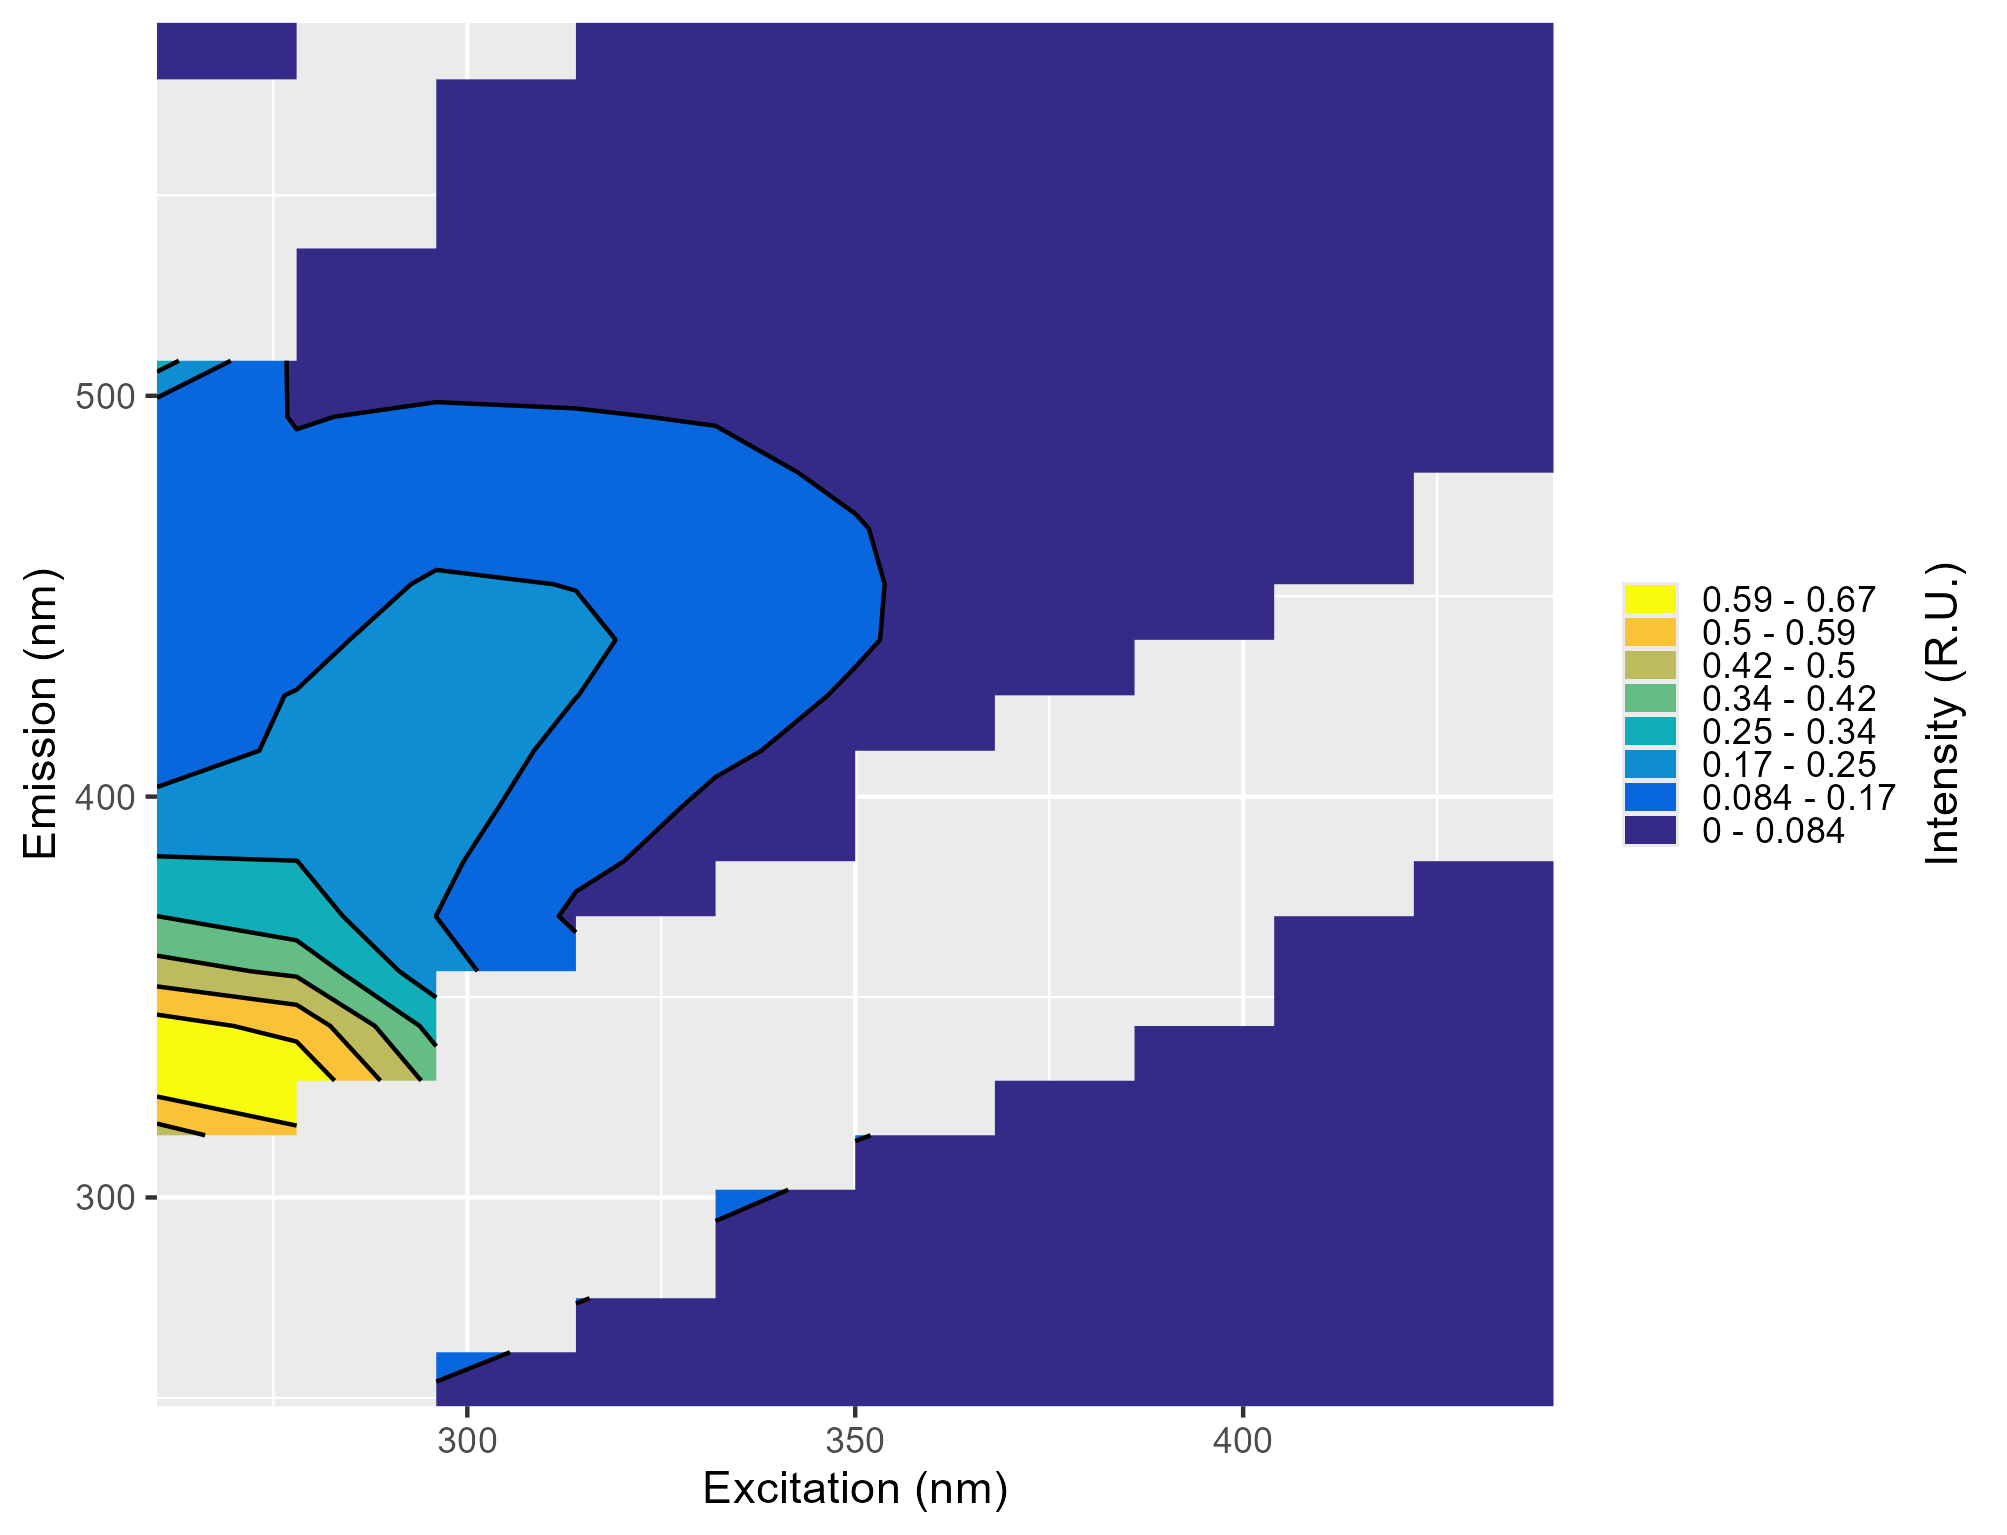
* .png: Plots of the individual EEMs
-
absorbance_plot_filename.png: Plot showing the absorbance spectra
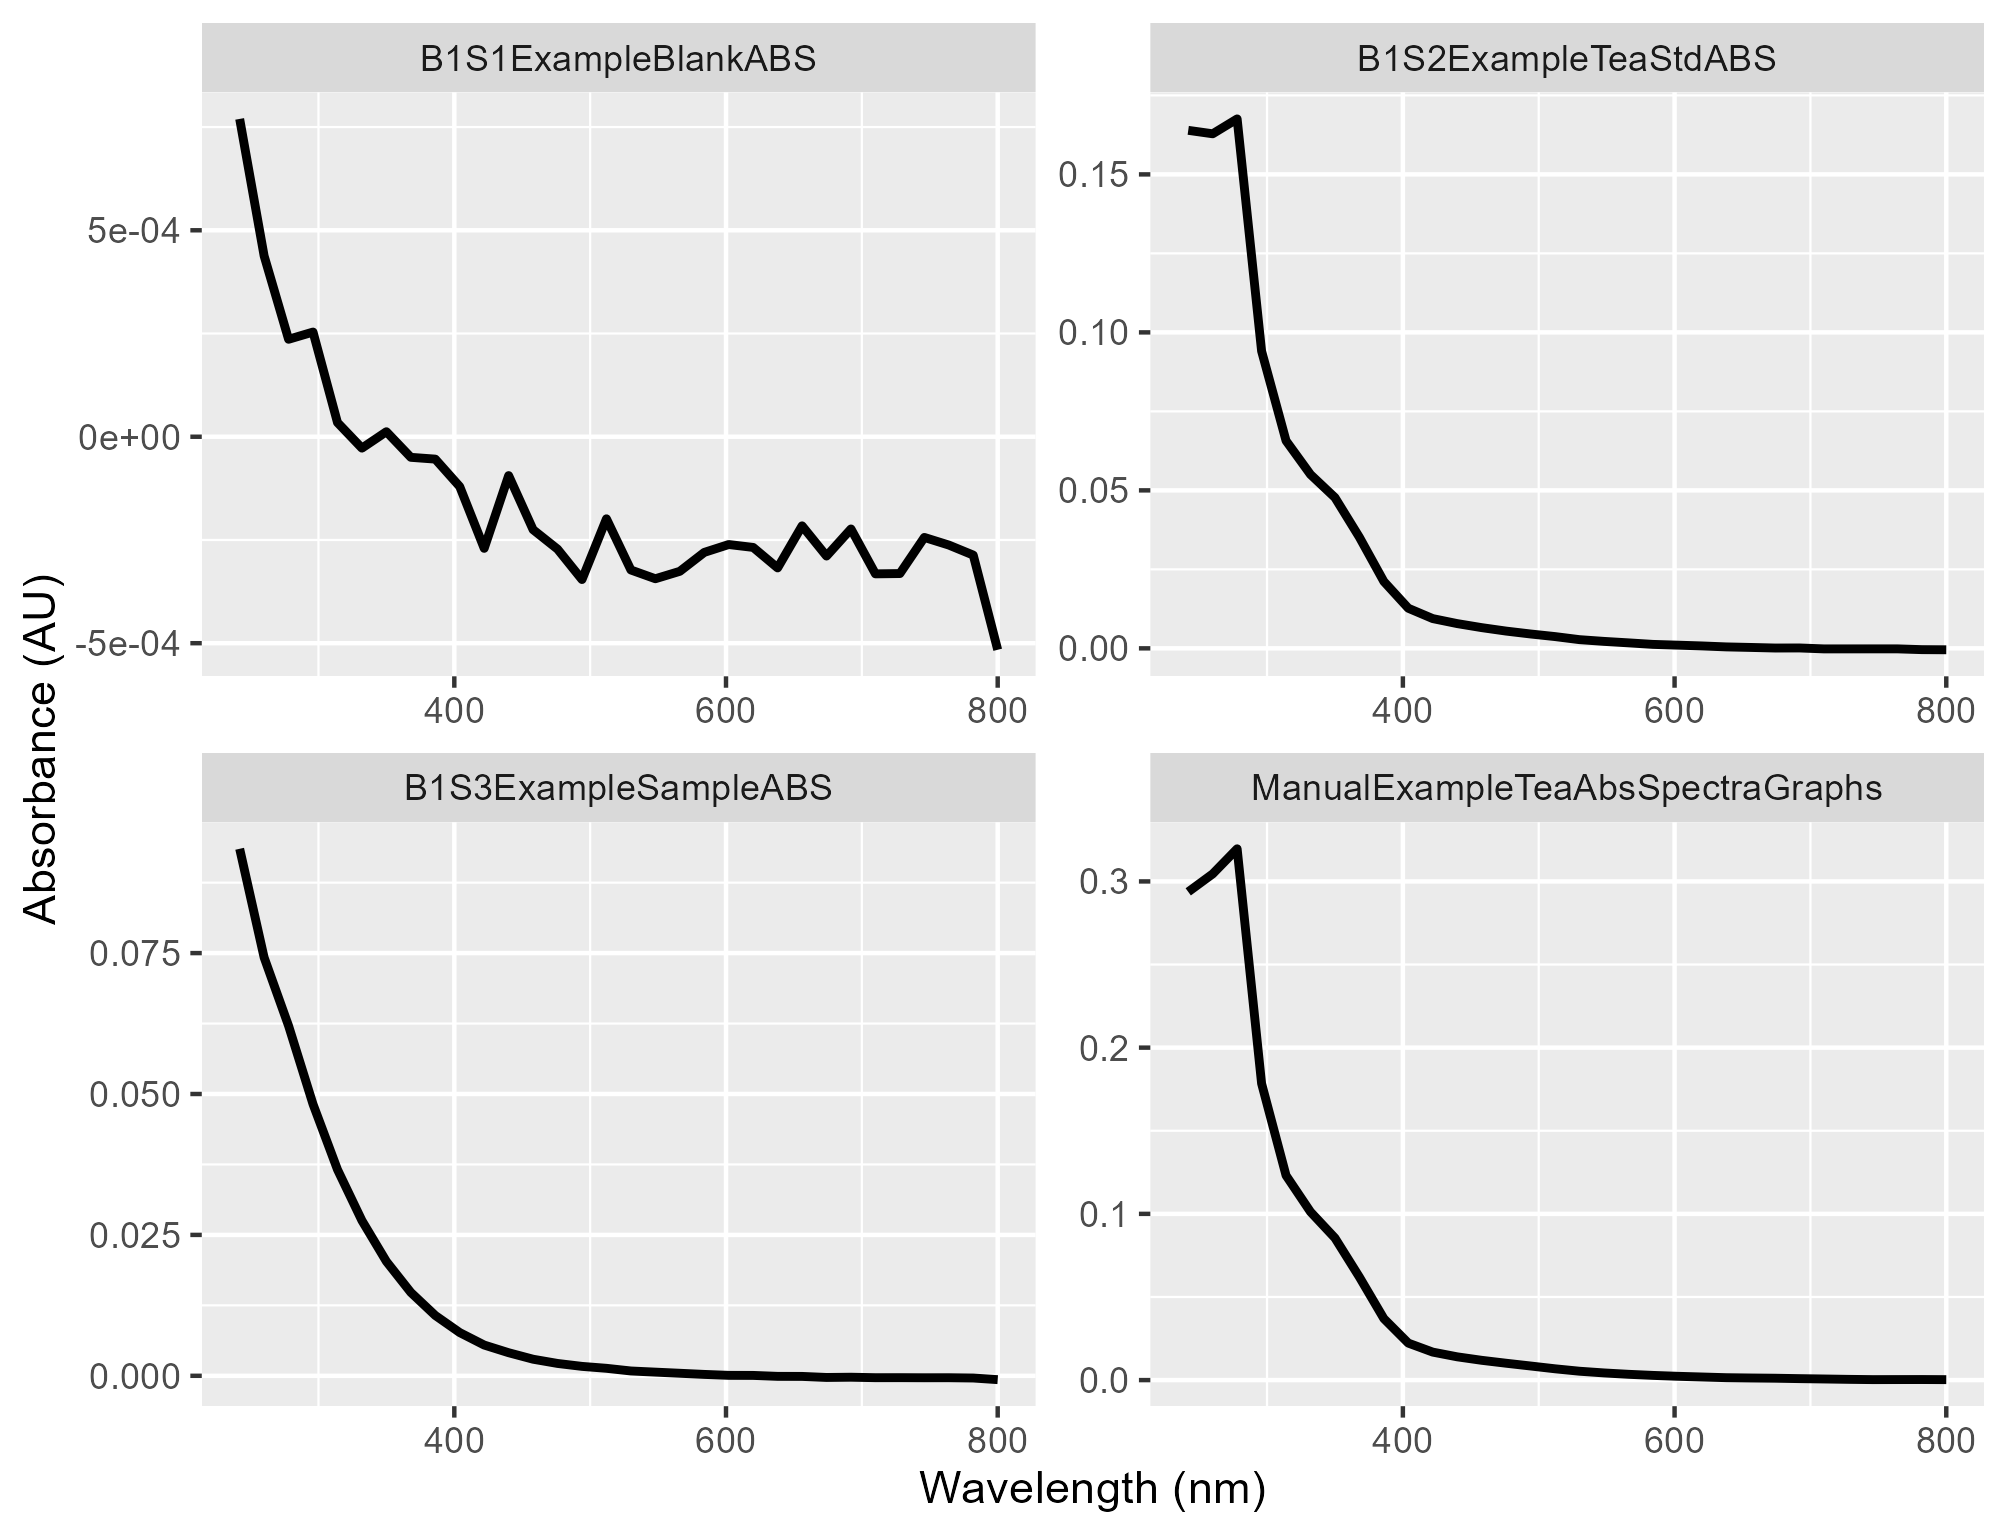
-
summary_plots_filename.png: Plot showing all of the EEMs together

-
*_indices_filename.csv:The absorbance and fluorescence indices
#> sample_name meta_name pB pT #> 1 B1S1ExampleBlankSEM ExampleBlank MDL01 MDL01 #> 2 B1S2ExampleTeaStdSEM ExampleTeaStd 0.5991 0.6624 #> 3 B1S3ExampleSampleSEM ExampleSample 0.08022 0.0836 #> 4 ManualExampleTeaWaterfallPlotSample ManualExampleTea 1.338_STD01 1.601_STD01 #> pA pM pC pD pE pN #> 1 DATA02_MDL01 MDL01 MDL01 MDL01 DATA01 MDL01 #> 2 0.2806_DATA02 0.1747 0.1453 0.01998 DATA01 0.2777 #> 3 0.3403_DATA02 0.1875 0.1969 0.09784 DATA01 0.0901 #> 4 0.7214_DATA02 0.3419_STD01 0.2801_STD01 0.03727_STD01 DATA01 0.6365_STD01 #> rAT rCA rCM rCT pB_DOCnorm pT_DOCnorm pA_DOCnorm #> 1 DATA01_DATA02 DATA01_DATA02 DATA01 DATA01 DOC01 DOC01 DOC01_DATA02 #> 2 0.4236_DATA02 0.518_DATA02 0.8321 0.2194 DOC01 DOC01 DOC01_DATA02 #> 3 4.071_DATA02 0.5786_DATA02 1.05 2.356 0.04135 0.04309 0.1754_DATA02 #> 4 0.4506_DATA02 0.3883_DATA02 0.8192 0.175 DOC01 DOC01 DOC01_DATA02 #> pM_DOCnorm pC_DOCnorm pD_DOCnorm pE_DOCnorm pN_DOCnorm FI HIX HIX_ohno #> 1 DOC01 DOC01 DOC01 DATA01 DOC01 MDL01 DATA01 DATA01 #> 2 DOC01 DOC01 DOC01 DATA01 DOC01 1.481 DATA01 DATA01 #> 3 0.09663 0.1015 0.05043 DATA01 0.04645 1.435 DATA01 DATA01 #> 4 DOC01 DOC01 DOC01 DATA01 DOC01 1.574 DATA01 DATA01 #> fresh BIX #> 1 MDL01 MDL01 #> 2 0.6044 0.6105 #> 3 0.5385 0.5466 #> 4 0.6591 0.6662 -
readme_filename.txt: A text file detailing the processing steps and any warnings that occurred during data processing
#> [1] "2026-04-15 15:34" #> [2] "Data processed using eemanalyzeR 1.1.0 package in R." #> [3] "For details on processing steps, indices, and QA/QC flags see the package website: https://katiewampler.github.io/eemanalyzeR/articles/output-documentation.html" #> [4] "______________________________" #> [5] "" #> [6] "2026-04-15 15:34:50: blanks were subtracted from data via 'subtract_blank' function" -
processed_data_filename.rds: An R readable object containing all of the exported data. Read in using
readRDS()function.#> <list> #> ├─eemlist: S3<eemlist>... #> ├─abslist: S3<abslist>... #> ├─readme: <list>... #> ├─metadata: S3<data.frame>... #> ├─indices: <list>... #> ├─eem_plot: <list>... #> └─abs_plot: S3<ggplot2::ggplot/ggplot/ggplot2::gg/S7_object/gg>
Setting up Processing Defaults
eemanalyzeR will process files directly “out of the
box”, but specific research projects may have differing processing
needs. If you would like to consistently modify the defaults used in the
run_eems() function you can use the
edit_user_config() function. This will create a YAML file
with your selected defaults which is stored on your computer will be
read when you load the package.
Creating QA/QC Standards
One of the goals with the eemanalyzeR package was to
build in QA/QC checks to ensure data quality. While not required to use
the package, you can use the create_mdl() and
create_std() functions to create your QA/QC files. These
functions require a directory of analytical blanks and check standards
(for instance the tea
standard recommended by the USGS). While you can create these
standards with any number of samples, its recommended to use at least 20
for stability.
QA/QC files should all come from the same instrument, using
the same wavelength spacing. Differences in integration time is okay as
the files are normalized for integration time. To make multiple
method based QAQC files, see the vignette creating-multiple-methods.
Use the following code to create the method detection limit (MDL) files. These by default will be stored in your user-specific data directory and loaded when needed to process samples.
#specify where the long-term blank files live
dir <- file.path(system.file("extdata", package = "eemanalyzeR"), "long-term-blanks")

#generate mdl file
eem_mdl <- create_mdl(dir, type = "eem")
abs_mdl <- create_mdl(dir, type = "abs")
We can use a similar process to create the check standard files.
#specify where the long-term blank files live
dir <- file.path(system.file("extdata", package = "eemanalyzeR"), "long-term-std")

#generate mdl file
eem_std <- create_std(dir, type = "eem", abs_pattern = "ABS")
abs_std <- create_std(dir, type = "abs", abs_pattern = "ABS")
These files will be used when calculating absorbance and fluorescence indices to ensure:
- Sample index values are “real” and distinguishable above a blank
(above MDL)
- Prevents reporting of values that are just noise
- The analytical blanks in the sample run are blank (below MDL)
- Checks for potential contamination
- Check standard index values in the sample run are consistent with a
long-term standard (within 20 % of mean standard)
- Checks for potential run issues (air bubbles, equipment issues, calculation issues)